How to Localize Your Vue Application with Tolgee?

Just another code and writer Adventurer who loves art and craft
Nowadays, providing solutions to specific problems identified in a domain has fueled the creation and growth of many companies and startups. But one problem arises which is how to market the product in various places given that not everyone does not have the same background. Even though English is one of the most used languages, especially in the professional domain, this does not exclude the other part of the population that uses other languages. To build an application or solution for a specific area, you need to assure that your solution will efficiently communicate with the target audience. Software localization is the process of adapting a product or a service offered by the software to meet the needs of a desired culture, population or language.
In this article, you will learn how to localize your Vue application in various languages with Tolgee an open-source tool. But before that let’s have an overview of what Tolgee and Vuejs are.
What is Tolgee?
Tolgee is an open-source platform that provides a user-friendly interface for organizing translations for developers and translators. It facilitates the translation process by providing a centralized site for all translation duties, such as managing translation files, translating text, and integrating with popular development tools such as Nextjs, Gatsby or Angular. Tolgee also provides a number of tools to aid collaborative translation operations, including translation memory. Tolgee is an all-in-one solution for project management and optimizing multilingual content distribution.
What is Vue.js?
Vue.js is a JavaScript framework used for creating user interfaces, PWA and single-page apps. It is intended to be adopted in stages and can also serve as a web application framework capable of powering complex single-page applications. Vue.js is well-known for its ease of use and simplicity, making it a popular choice among developers for creating scalable and performant web apps.
How to Integrate Tolgee into a Vue Application
This selection highlights a step-by-step approach to integrating Togee into a Vue application.
Step 1: Install Tolgee
You can either create a Tolgee project via the Tolgee Cloud Platform or self-host it. In this tutorial, we will use the hosted version of Tolgee. However, you can host the server on your own via Docker. If you don’t have Docker installed use this Docker quick guide to get started
It is recommended to run it in a single container.
docker run -v tolgee_data:/data/ -p 8085:8080 tolgee/tolgee
Then follow this guide to configure your Tolgee project.
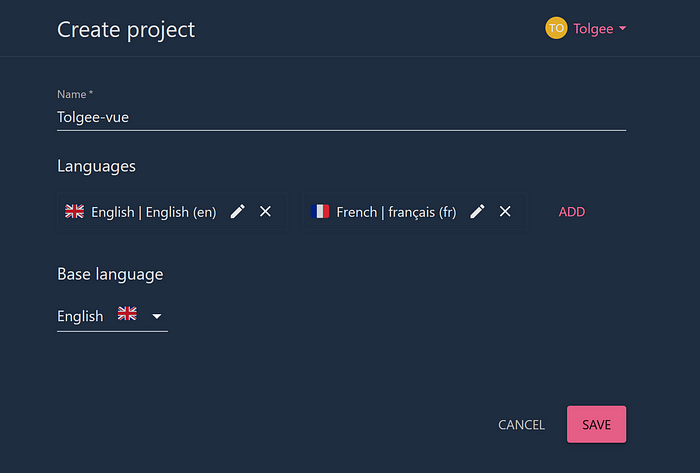
Step 2: Create a Project
Once everything is set up, log into your account and create a new project. Give a name to your project and add the languages you wish your app to use. In this tutorial, the app will use three languages: English, French and Spanish
Step 3: Generate API Key
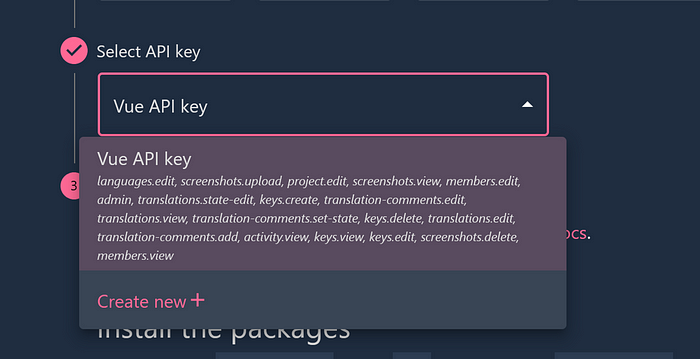
Still, in your Tolgee dashboard, navigate to integrate; the last element in the left menu and select Vue among the list of app integrations

Then in the select input, click on Create new to create a new API Key.
Name your API key and select the period of time you wish to use it and click on Save.
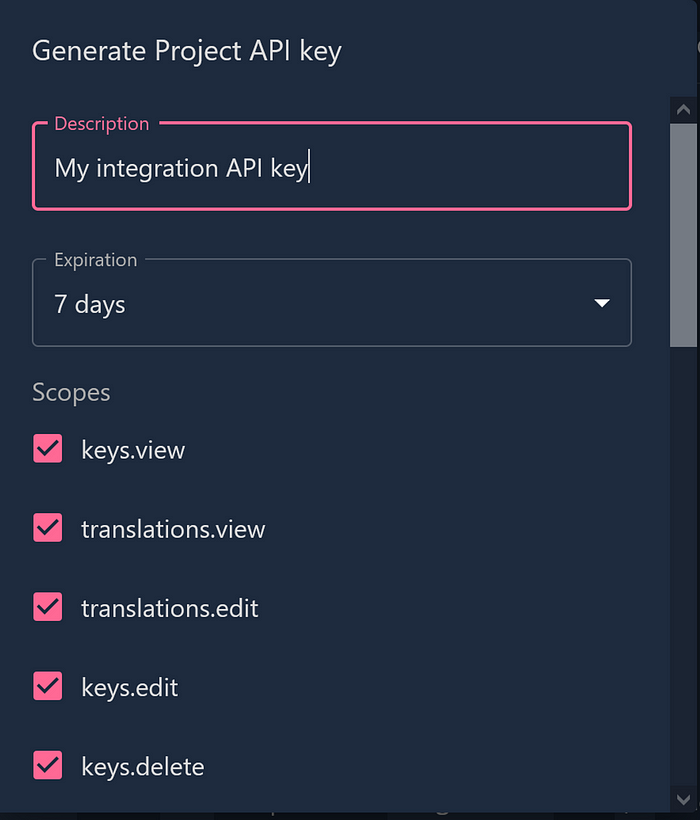
This will generate a first-time-only token that you need to save somewhere on your PC because you will use it later.
Step 4: Add Tolgee to Your Vue application
Navigate to your desired directory and run the following command :
npm init vue@latest
You will be prompted to provide your project’s name and other information.
If you already have a project setup, you can skip this step.
Vue.js - The Progressive JavaScript Framework
√ Project name: ... vue-tolgee
√ Add TypeScript? ... No / Yes
√ Add JSX Support? ... No / Yes
√ Add Vue Router for Single Page Application development? ... No / Yes
√ Add Pinia for state management? ... No / Yes
√ Add Vitest for Unit Testing? ... No / Yes
√ Add an End-to-End Testing Solution? » No
√ Add ESLint for code quality? ... No / Yes
√ Add Prettier for code formatting? ... No / Yes
Once the command is executed, navigate to the project’s root directory and run npm install, then npm run dev to start the app.
If your application does not automatically open, type [localhost:5173](http://localhost:5173)`` in your browser to visualise your freshly created application.
If your project is a Vue 3 Typescript project create shims-vue.d.ts file and add the following code:
/* eslint-disable */
declare module '*.vue' {
  import type { DefineComponent } from 'vue';
  const component: DefineComponent<{}, {}, any>;
  export default component;
}
This will allow you to import vue components.
Step 5: Install Tolgee Package
Now use the command below to install Tolgee.
cd vue-tolgee
npm install @tolgee/vue
Step 6: Add Environment Variable:
Create env.development.local file if you don’t have one at the root of your project and paste the following code
VUE_APP_TOLGEE_API_URL=<host>
VUE_APP_TOLGEE_API_KEY=<Only new key can be revealed>
VUE_APP_TOLGEE_API_URL is where your Tolgee server is hosted
VUE_APP_TOLGEE_API_KEY is your API key. If somehow you lost the API key you generated earlier, you can regenerate a new one.
Click on your profile picture at the top right corner of the dashboard
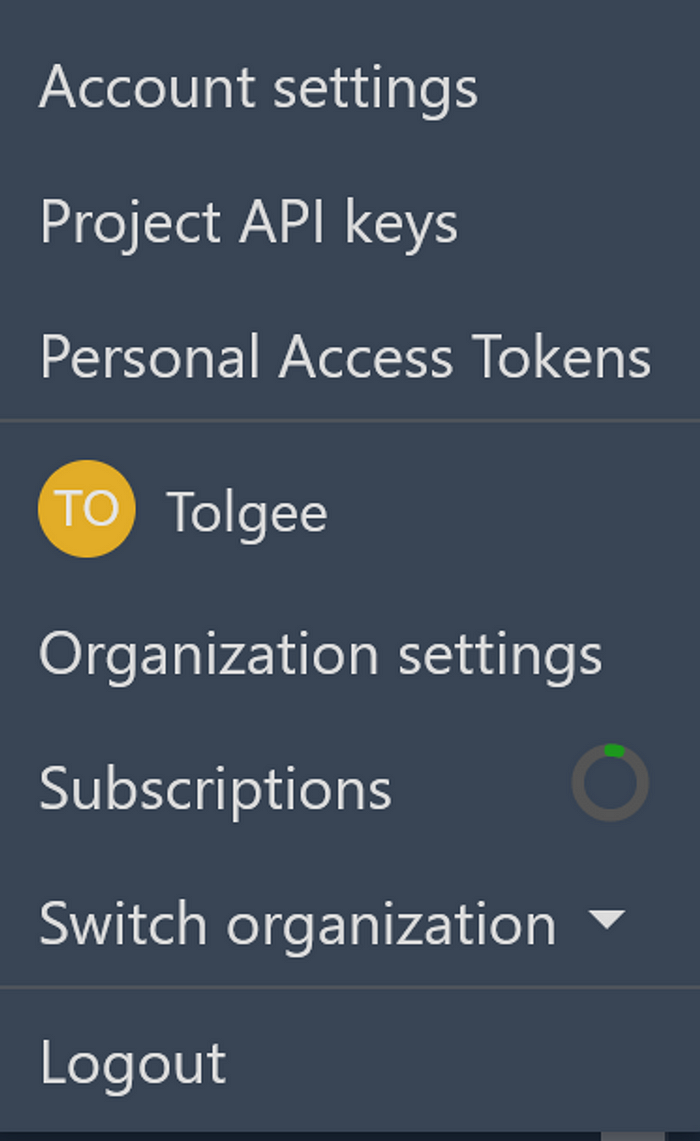
Then Select Project API Keys. In the new window that opens, either you add a new API key or you generate a new one. Make sure to save the API key somewhere this time in case you failed to do it previously.
Once your API key is ready, you can now add it to your env file.
Step 7: Initialize Tolgee
Update your main.ts found at the root of your project with the following code:
import './assets/main.css';
import { createApp } from 'vue';
import App from './App.vue';
import {
  BackendFetch,
  DevTools,
  Tolgee,
  FormatSimple,
  VueTolgee,
} from '@tolgee/vue';

const tolgee = Tolgee()
  .use(DevTools())
  .use(FormatSimple())
  .use(BackendFetch())
  .init({
    language: 'en',
    apiUrl: import.meta.env.VITE_TOLGEE_API_URL,
    apiKey: import.meta.env.VITE_TOLGEE_API_KEY,
  });
const app = createApp(App);
app.use(VueTolgee, { tolgee });
app.mount('#app');
Then wrap your code in src/app.vue in TolgeeProvider tag like below:
<template>
  <TolgeeProvider>
    <header>
      <img
        alt="Vue logo"
        class="logo"
        src="./assets/logo.svg"
        width="125"
        height="125"
      />
      <div class="wrapper">
        <HelloWorld msg="You did it!" />
      </div>
    </header>
    <main>
      <TheWelcome />
    </main>
  </TolgeeProvider>
</template>
Step 8: Add Translations
Now head to your Tolgee server and add some translations. In this tutorial, you will be translating the default Vue 3 starting application so for each text, add a keyname, and add the default English text. Make sure to conventionally name your translations.
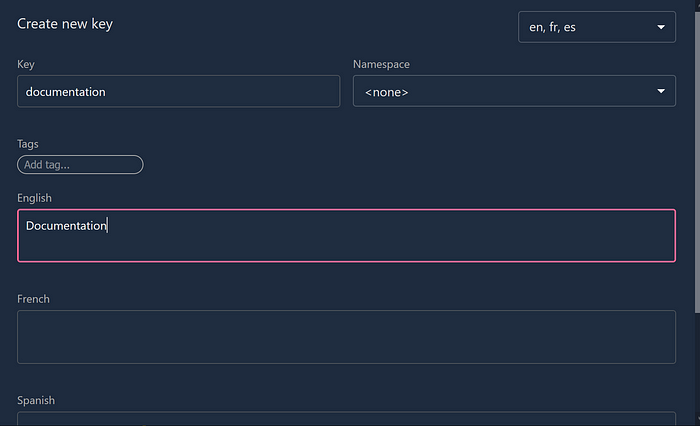
Then click on the French and Spanish input to select a translation from the machine-generated translations that best describes the text. You can adjust if you feel that the text does not fit its context.
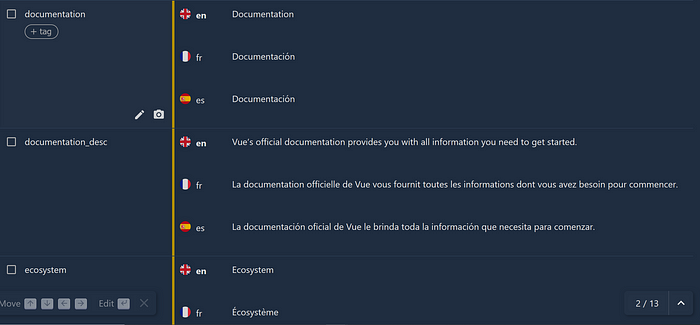
Repeat this process until all translations are added. In the end, you should see the list of translations below.
Step 9: Create a Select Component
The select component will help you easily switch from one language to another. In your src/components created selector.vue file and add the following code:
<script setup>
import { useTolgee } from '@tolgee/vue'
const tolgee = useTolgee(['language'])
const changeLanguage = (e) => {
  tolgee.value.changeLanguage(e.target.value)
}
</script>
<template>
  <select :value="tolgee.getLanguage()" v-on:change="changeLanguage" class="selector">
    <option value="en">🇬🇧 English</option>
    <option value="fr">🇫🇷 Français</option>
    <option value="es">🇪🇸 Español</option>
  </select>
</template>
Now let’s give some style to the select tag with the following code in src/assets.main.css:
.selector {
  display: block;
  text-align: center;
  width: 80%;
  padding: 10px;
  border-radius: 5px;
  font-size: 18px;
  border: none;
  background: rgba(0, 255, 255, 0.51);
  -webkit-appearance: none;
  -moz-appearance: none;
  text-indent: 1px;
  text-overflow: '';
  cursor: pointer;
  margin-left: 10px;
Step 10: Add Translation Keynames
This is the last step which consists of adding translation keynames. A typical translation looks like this:
import { T } from '@tolgee/vue';

<T keyName="documentation" defaultValue="Documentation" />;
So in your src/components/TheWelcome.vue replace your code with the following:
And src/components/HelloWorld.vue add:
<script setup lang="ts">
import { T } from '@tolgee/vue'
...
</script>

<template>
  <div class="greetings">
   ...
    <h3>
      <T keyName="success" defaultValue="You've successfully created a project with Vite + Vue 3" />
    </h3>
  </div>
</template>
Finally, update your App.vue file with the code below:
In the code block above, we have updated our components imports and added the Selector component we created earlier.
But there is one last thing we need to do, which is to add our translation files to the Vue project.
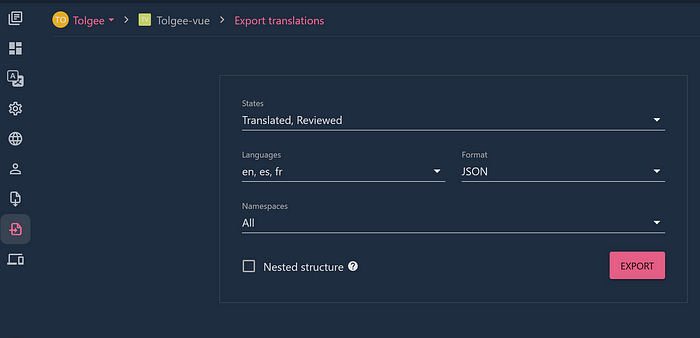
In your Tolgee dashboard, click on export in the left menu, then select the languages you wish to use and click on export.
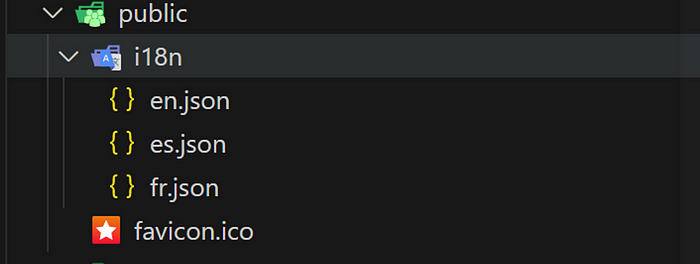
Create i18n folder in your Vue application public folder and add the extracted files
utilis/i18n/en.json
{
  "documentation": "Documentation",
  "documentation_desc": "Vue’s official documentation provides you with all information you need to get started.",
  "tooling": "Tooling",
  "tooling_desc": "This project is served and bundled with Vite. The recommended IDE setup is VSCode + Volar. If you need to test your components and web pages, check out Cypress and Cypress Component Testing. More instructions are available in README.md.",
  "ecosystem": "Ecosystem",
  "ecosystem_desc": "Get official tools and libraries for your project: Pinia, Vue Router, Vue Test Utils, and Vue Dev Tools. If you need more resources, we suggest paying Awesome Vue a visit. ",
  "community": "Community",
  "community_desc": "Got stuck? Ask your question on Vue Land, our official Discord server, or StackOverflow. You should also subscribe to our mailing list and follow the official @vuejs twitter account for latest news in the Vue world. ",
  "support Vue": "Support Vue",
  "support Vue_desc": "As an independent project, Vue relies on community backing for its sustainability. You can help us by becoming a sponsor. "
    "readme": "More instructions are available in README.md.",
  "success": "You’ve successfully created a project with Vite + Vue 3",
  "hello": "Hello"
}
utilis/i18n/fr.json
{
  "documentation": "Documentación",
  "documentation_desc": "La documentation officielle de Vue vous fournit toutes les informations dont vous avez besoin pour commencer.",
  "tooling": "Outillage",
  "tooling_desc": "Ce projet est servi et groupé avec Vite. La configuration IDE recommandée est VSCode + Volar. Si vous avez besoin de tester vos composants et vos pages Web, consultez Cypress et Cypress Component Testing. Plus d'instructions sont disponibles dans README.md.",
  "ecosystem": "Écosystème",
  "ecosystem_desc": "Obtenez des outils et des bibliothèques officiels pour votre projet : Pinia, Vue Router, Vue Test Utils et Vue Dev Tools. Si vous avez besoin de plus de ressources, nous vous suggérons de rendre visite à Awesome Vue.",
  "community": "Communauté",
  "community_desc": "Est resté coincé? Posez votre question sur Vue Land, notre serveur Discord officiel, ou StackOverflow. Vous devez également vous inscrire à notre liste de diffusion et suivre le compte Twitter officiel @vuejs pour les dernières nouvelles du monde Vue.",
  "support Vue": "Soutenir Vue",
  "support Vue_desc": "En tant que projet indépendant, Vue s'appuie sur le soutien de la communauté pour sa durabilité. Vous pouvez nous aider en devenant parrain.",
  "readme": "Plus d'instructions sont disponibles dans README.md.",
  "success": "Vous avez réussi à créer un projet avec Vite + Vue 3",
  "hello": "Bonjour"
}
utilis/i18n/es.json
{
  "documentation": "Documentación",
  "documentation_desc": "La documentación oficial de Vue le brinda toda la información que necesita para comenzar.",
  "tooling": "Estampación",
  "tooling_desc": "Este proyecto se sirve y se incluye con Vite. La configuración IDE recomendada es VSCode + Volar. Si necesita probar sus componentes y páginas web, consulte Cypress y Cypress Component Testing. Más instrucciones están disponibles en README.md.",
  "ecosystem": "Ecosistema",
  "ecosystem_desc": "Obtenga herramientas y bibliotecas oficiales para su proyecto: Pinia, Vue Router, Vue Test Utils y Vue Dev Tools. Si necesita más recursos, le sugerimos que visite Awesome Vue. ",
  "community": "Comunidad",
  "community_desc": "¿Quedó atascado? Haga su pregunta en Vue Land, nuestro servidor oficial de Discord o StackOverflow. También debe suscribirse a nuestra lista de correo y seguir la cuenta oficial de Twitter @vuejs para conocer las últimas noticias en el mundo de Vue. ",
  "support Vue": "Soporte Vue",
  "support Vue_desc": "Como proyecto independiente, Vue depende del respaldo de la comunidad para su sostenibilidad. Puedes ayudarnos convirtiéndote en patrocinador. ",
  "readme": "Hay más instrucciones disponibles en README.md.",
  "success": "Ha creado con éxito un proyecto con Vite + Vue 3",
  "hello": "Hola"
}
If you re-run your application, it should be working perfectly like the screenshot below:
You can find the full working code in this GitHub Repository.


