
How to Build an Art Mobile Store with Medusa and Flutter?
Building a Mobile Flutter commerce


This article provides a step-by-step guide to building an art mobile store with Medusa and Flutter.
Introduction
While ecommerce websites are quite evolving today, many companies in the domain have started building mobile shopping applications to improve user experience and engage various audiences since it offers users features such as smooth navigation, push notifications,
Flutter is a cross-platform UI development kit that allows you to reuse code across many platforms like iOS, Android, Web or Desktop. So it is a great option for developers who want to create high-quality apps that can be used on multiple platforms. It is also a good choice for developers who want to save time and money by developing apps from a single codebase
On the other hand, Medusa allows you to build a high-performing headless ecommerce store as it offers you the possibility to choose your own development stack giving you full control over your store. Besides this, it comes with a lot of features like plugins, API Customization, commerce modules and more
This tutorial shows you how to build an Android ecommerce application with Medusa and Flutter that sells art objects. You can find the source code of the Flutter application on this Github repository.
Prerequisites
You need to have the following tools already setup in your machine to work with this tutorial
Node version 16 or the latest version
And IDE(This tutorial uses Android Studio)
Project Setup
To get started you need to set up a Medusa Server, an Admin Dashboard and a Storefront. The admin dashboard comes as an NPM package. You can install it in the Medusa Backend
Setting up Medusa
- Install Medusa CLI: Use the command below to install the Medusa CLI. It will help you to access the Medusa server.
yarn install -g @medusajs/medusa-cli
- Create Medusa Project: Navigate to a desired directory and create a Medusa project with the command below.
medusa new flutter-art-store --seed
This command will set up your project and install the necessary dependencies. The --seed flag at the end of this command will populate your store with default products. Medusa has a local file for uploading images but you could equally integrate file services like MinIO, DigitalOcean Space or S3
- Run your Server: Once your project is fully installed, use the command below to start the Medusa server.
cd flutter-art-store
medusa develop
By default, the server runs on localhost:9000/
- Install Medusa Admin: Now that your server is ready, you need to set up your dashboard in order to start managing products, customers, orders, regions and other functionalities of your store. Navigate to the Medusa backend folder and run the following command in another terminal
cd fluter-art-store
yarn add @medusajs/admin
Add the Admin plugin to Medusa Configurations
Add the following code in your
medusa-config.jsin the plugin array:const plugins = [ // ... { resolve: "@medusajs/admin", /** @type {import('@medusajs/admin').PluginOptions} */ options: { // ... }, }, ]This admin plugin has the following parameters:
serve: A boolean value indicating whether the admin dashboard should be served when the Medusa backend launches. Thedevcommand can be used to serve the admin dashboard if it is set to false. This value is true by defaultpath: A string specifying the recommended path for the admin server to follow. It cannot be one of the reserved paths, such as "admin" or "store," nor should it be prefixed or suffixed with a slash (/). The default path isappoutDir: An optional parameter to output the admin build files.autoRebuild: a boolean indicating if the admin UI needs to be rebuilt if there are any changes or if the backend detects a missing build. If not configured, you must manually create the admin dashboard. It is set tofalseby default
Now test your admin by running the following command:
npx @medusajs/medusa-cli develop
The admin dashboard and Medusa Backend both launch at this point. The admin will by default be accessible at localhost:9000/app.

Since you installed the Medusa backend with the
--seedparameter, you can log in to the admin panel withadmin@medusa-test.comand passwordsupersecretYou can equally create a new user with the following command:
npx @medusajs/medusa-cli user -e some@email.com -p some-password
Where some@email.com is your email address and some-password is your password
Add Products: To complete this part, log in to the admin panel and create as many art products as possible with various variants and publish them.
Setup Flutter App
The next phase consists of setting up your Flutter app. If you don't know how to set up your environment for Flutter development follow the setup guide in the Flutter Documentation
Create a Flutter Application: Run the following command to create a Flutter app:
flutter create art_storeThen create a simple project structure. This is how this tutorial's project is organised

main.dartis the starting point of the application. It launches theArtAppWidgetutils: This package hosts a file for storing the applications utilities such as colors and fonts
screens: This package holds all the screens of the app
models: It holds the model that you will use to map JSON responses
controllers: For state management
components: This package holds all the components of the application
api: It contains two files;
base.dartwhich contains the Base Url of the application and art.dartto make API calls
Install Packages
This tutorial uses 2 Flutter packages. You can get them from pub.dev
http: This will help with API consumption and network calls
get: For state management
Flutter native splash(add this package later)
To install these packages, add them to the pubspec.yaml run flutter pub get

Set Up Model
Now it’s time to create the models that will map responses from HTTP calls for displaying art products in your app.
Note that this art product model reflects the information you wish to acquire from the Medusa API(id, title, description, image, price and size of the product). So if you wish to add other information to your store like tags, collections or any other data, please check out the Store API
Add the following code in lib/models/artModel.dart :
class Arts {
  Arts({
    required this.id,
    required this.title,
    required this.description,
    required this.thumbnail,
    required this.options,
    required this.images,
    required this.variants,
  });
  String id;
  String title;
  String description;
  String thumbnail;
  List<Option> options;
  List<Image> images;
  List<Variant> variants;
  factory Arts.fromJson(Map<String, dynamic> json) => Arts(
    id: json["id"],
    title: json["title"],
    description: json["description"],
    thumbnail: json["thumbnail"],
    options: List<Option>.from(json["options"].map((x) => Option.fromJson(x))),
    images: List<Image>.from(json["images"].map((x) => Image.fromJson(x))),
    variants: List<Variant>.from(json["variants"].map((x) => Variant.fromJson(x))),
  );
}

class Image {
  Image({
    required this.url,
  });
  String url;
  factory Image.fromJson(Map<String, dynamic> json) => Image(
    url: json["url"],
  );
}

class Option {
  Option({
    required this.title,
    required this.values,
  });
  String title;
  List<Value> values;
  factory Option.fromJson(Map<String, dynamic> json) => Option(
    title: json["title"],
    values: List<Value>.from(json["values"].map((x) => Value.fromJson(x))),
  );
}

class Value {
  Value({
    required this.id,
    required this.value,
  });
  String id;
  String value;
  factory Value.fromJson(Map<String, dynamic> json) => Value(
    id: json["id"],
    value: json["value"]!,
  );
}

class Variant {
  Variant({
    required this.id,
    required this.title,
    required this.prices,
    required this.options,
  });
  String id;
  String title;
  List<Price> prices;
  List<Value> options;
  factory Variant.fromJson(Map<String, dynamic> json) => Variant(
    id: json["id"],
    title: json["title"]!,
    prices: List<Price>.from(json["prices"].map((x) => Price.fromJson(x))),
    options:
    List<Value>.from(json["options"].map((x) => Value.fromJson(x))),
  );
}

class Price {
  Price({
    required this.id,
    required this.currencyCode,
    required this.amount,
  });
  String id;
  String currencyCode;
  int amount;
  factory Price.fromJson(Map<String, dynamic> json) => Price(
    id: json["id"],
    currencyCode: json["currency_code"]!,
    amount: json["amount"],
  );
}
From the code above, there are three types of properties:
First-level properties: id, title, description and thumbnail
Second-level properties: option, image and variant
Three-level properties: value, price
Since option and image data are in the second-level you need to create each class for them, Equally from the code above, the Option class contains data about the value of the product and to access the third-level class you need to create a Value class. Finally, the Variant contains the price of the art product, so you equally need to create another class for the Price to access its code and currency or currencies
Working with API
In this section, you will learn how to set up a base URL and start making API calls.
Create a Base URL
Add the code below in your lib/api/base.dart file:
class Base {
   static const String baseUrl = '<http://192.168.63.8:9000>';
}
Replace the <http://192.168.63.8:9000> with your system’s IP address since Flutter does not recognize [localhost](localhost)`. Equally, it does not supporthttp://because it sees it as an insecure request. A simple tip to use is to add the following code in yourandroid/app/src/main/AndroidManifest.xml` activity tag
<activity

  android:usesCleartextTraffic="true" //add this
    android:name=".MainActivity"
....
</activity>
Retrieving Art Product Data
In your lib/api/art.dart add the following code
import 'dart:convert';
import 'package:http/http.dart' as http;
import '../models/artModel.dart';
import 'base.dart';

class ArtApi {
  Future<List<Arts>> getAllArts() async {
    final url = Uri.parse('${Base.baseUrl}/store/products');
    try {
      final response = await http.get(url);
      if (response.statusCode == 200) {
        var result = jsonDecode(response.body);
        var data = result['products'];

        return List<Arts>.from(data.map((x) => Arts.fromJson(x)));
      } else {
        return Future.error('Server error');
      }
    } catch (e) {
        return Future.error(e);
    }
  }
}
The code above, show how to use the http package and the base URL to make an HTTP request to the server, and if the request is successful, it decodes the response, which is kept in the result variable. The art object is filtered into a data variable before being looped through by the Model. Else it returns a message error.
State Management
In this tutorial, we use Getx to manage the state of the application.
In your lib/controller/artController.dart add the code below:
import 'package:get/get.dart';
import '../api/art.dart';
import '../models/artModel.dart';

class AllArtsController extends GetxController {
  var getAllArts = <Arts>[].obs;
  var isLoading = true.obs;

  @override
  void onInit() {
    super.onInit();
    fetchAllArt();
  }

  void fetchAllArt() async {
    isLoading(true);
    try {
      var getAllArtResult = await ArtApi().getAllArts();
      getAllArts.value = getAllArtResult;
    } finally {
      isLoading(false);
    }
  }
}
You can notice from the code that we extend the art controller with GetxController in order to access the get management system. Then, assign the incoming API response to a variable getAllArts which will update automatically when it notices any data change. Lastly, we use an indicator isLoading to know if data is been fetched or not
Building the App Interfaces
Before working on the interfaces, clean the main.dart file by replacing it with the following code
import 'package:art_store/screens/homeScreen.dart';
import 'package:flutter/material.dart';
import 'package:get/get.dart';
import 'package:flutter_native_splash/flutter_native_splash.dart';

void main() {
  runApp(const ArtApp());
}

class ArtApp extends StatelessWidget {
  const ArtApp({super.key});

  // This widget is the root of your application.
  @override
  Widget build(BuildContext context) {
    return GetMaterialApp(
      title: 'Medusa Art Store',
      debugShowCheckedModeBanner: false,
      theme: ThemeData(
        colorScheme: ColorScheme.fromSeed(seedColor: Colors.indigoAccent),
        useMaterial3: true,
      ),
      home: const HomeScreen(),
    );
  }
}
The GetMaterialApp from the get package gets the material design for your app. It gives access to the get's state management and navigation. Additionally, the app uses the useMaterial3 design before finally routing to the HomeScreen, which is our initial screen. You may encounter an error since you have not yet created the HomeScreen. No worry, you will soon create one. But before that let’s add a splash screen.
Equally, add this piece of code in your lib/utils/utilities.dart
import 'package:flutter/material.dart';

// Colors
Color kWhite = Color(0xffffffff);
Color kPrimary = Color(0xffFB1164);
Color kPrimaryLight = Color(0xffd36e99);
Color kDark = Color(0xFF605A65);
Color kBlack = Color(0xFF000000);
This is the list of the main custom colors of the app. It’s easy to access these colors via their name in the entire app. We will populate this file each time when necessary throughout the tutorial
Build the SplashScreen
Creating a splash screen with the flutter native screen package, no need to create a separate file that redirects to the Homescreen like in the old days.
Open your pubspec.yaml file and add the following lines:
dependencies:
  ...
  flutter_native_splash: ^2.3.1

dev_dependencies:
  ...

flutter_native_splash:
  android: true
  ios: false
  web: false
  color: "#ffffff"
  image: "assets/logoart.png"
The package takes in some parameters which include:
An image that will be displayed at the center of the screen(don’t forget to create
lib/assetsfolder and add your app logo)Color represent the background color of the splashscreen
Finally android, ios and web indicates whether to add the splash screen on the various platforms or not.
Once you have added that run the following command to create your splash screen:
flutter clean && flutter pub get && flutter run flutter_native_splash:create
Next, in your main.dart change your main function with the code below:
import 'package:flutter_native_splash/flutter_native_splash.dart';

// Show splashscreen and remove after 5 seconds
Future main() async {
 WidgetsFlutterBinding.ensureInitialized();

  await Future.delayed(const Duration(seconds: 5));
  FlutterNativeSplash.remove();
  runApp(const ArtApp());
}
This code simply says that the app should initial the app with the native splash and remove it after 5 seconds then run your application. If you run your app now, you will have a functional splash screen like below

Build the HomeScreen
The home screen will display the various products of your art shop. You need to build an art card component that displays individual art products and art components that shows the list of art in the home screen
ArtCard Component
This component is responsible to display the appearance of an art product. In your lib/components/artCard.dart and the following code to create your art card component
import 'package:art_store/utils/utilities.dart';
import 'package:flutter/material.dart';
import 'package:get/get.dart';
import '../models/artModel.dart' as model;
import '../screens/ArtDetailScreen.dart';

class ArtCard extends StatelessWidget {
  const ArtCard({Key? key, required this.art}) : super(key: key);

  final model.Arts art;

  @override
  Widget build(BuildContext context) {
    return SizedBox(
        width: 140,
        child: GestureDetector(
            onTap: (){
              //Todo: Bring me to the art Details Screen
              Get.to(() => ArtDetails(art: art));
            },
            child: Column(
              crossAxisAlignment: CrossAxisAlignment.start,
              children: [
                Expanded(
                  child: Hero(
                    tag: art.id.toString(),
                    child: Container(
                      padding: const EdgeInsets.all(20),
                      width: Get.width,
                      decoration: BoxDecoration(
                        color: Colors.black,
                        border: Border.all(color: kPrimary ),
                        borderRadius: BorderRadius.circular(5),

                      ),
                      child: Image.network("http://192.168.63.8:9000${Uri.parse(art.thumbnail).path}")
                        // child:
                    ),
                  ),
                ),
                const SizedBox(height: 10),
                Padding(
                    // padding: const EdgeInsets.only(top: 10.0, bottom: 10.0),
                    padding: const EdgeInsets.symmetric(horizontal: 10.0),
                    child: Text(
                      art.title,
                      style: TextStyle(
                          color: kBlack, fontWeight: FontWeight.w600),
                      maxLines: 2,
                    )),
                const SizedBox(height: 10),
                Padding(
                    padding: const EdgeInsets.symmetric(horizontal: 10.0),
                    child: Text("\\€${art.variants[0].prices[0].amount / 100}",
                        style: const TextStyle(
                          fontSize: 18,
                          fontWeight: FontWeight.w600,
                          color: Color(0xffFB1164),
                        ))),
                const SizedBox(height: 10),
              ],
            )));
  }
}
From the code block, art populates and displays the ArtCard component with data like art image title and size. The component is then wrapped in a GestureDetector Widgets which bring the user to the art detail screen onTap. The image is decorated with a border and a black background color.
Arts Component
This component displays the list of products to the user. To create this component, add the code below in your lib/components/art.dart file
import 'package:art_store/components/artCard.dart';
import 'package:art_store/utils/utilities.dart';
import 'package:flutter/material.dart';
import 'package:get/get.dart';
import '../controllers/artController.dart';

class Arts extends StatelessWidget {
  Arts({Key? key}) : super(key: key);

  final artController = Get.put(AllArtsController());

  @override
  Widget build(BuildContext context) {
    return Center(
      child: SingleChildScrollView(
          child:  Container(
            margin: EdgeInsets.symmetric(vertical: 15.0),
            child: Column(children: [
              const SizedBox(height: (20)),
              Obx(() => SizedBox(
                    width: double.infinity,
                    child: artController.isLoading.value
                        ? Center(
                      child: CircularProgressIndicator(color: kPrimary,),
                    )
                        : Padding(
                      padding: const EdgeInsets.symmetric(horizontal: 20.0),
                      child: GridView.builder(
                          physics: const NeverScrollableScrollPhysics(),
                          shrinkWrap: true,
                          itemCount: artController.getAllArts.length,
                          gridDelegate:
                          const SliverGridDelegateWithFixedCrossAxisCount(
                            crossAxisCount: 2,
                            crossAxisSpacing: 20,
                            mainAxisSpacing: 20,
                            childAspectRatio: 0.6,
                          ),
                          itemBuilder: (BuildContext context, int index) =>
                              ArtCard(
                                art: artController.getAllArts[index],
                              )),
                    )),
              ),
            ]),
          )),
    );
  }
}
Here we use a Gridview.builder to display the list of art products automatically fetched from the getAllArt created in the AllArtsController class you created earlier. Don’t forget to initialize on loading the ArtCard class that will show a loading indicator(CircularProgressIndicator) while waiting to fetch and display the list. It equally improves user experience as it tells the user that the app is up to something
Now that you have built the components you will in the home screen, head to your lib/screens/homeScreen.dart and add the following code:
import 'package:art_store/utils/utilities.dart';
import 'package:flutter/material.dart';
import 'package:flutter_feather_icons/flutter_feather_icons.dart';
import '../components/arts.dart';

class HomeScreen extends StatelessWidget {
  const HomeScreen({Key? key}) : super(key: key);
  @override
  Widget build(BuildContext context) {
    return Scaffold(
      appBar: AppBar(
        elevation: 0,
        backgroundColor: kPrimary,
        leading: IconButton(icon: Icon(FeatherIcons.menu, color: kWhite,), onPressed: () {
          //Todo: Open AppDrawer on Press
        },),
        title: Text('Home', style: TextStyle(color: kWhite),),
      ),
      body: Arts(),
    );
  }
}
The HomeScreen houses a Scaffold that contains the appbar with a background that displays the title of the current screen and the body that displays the list of art products. There is equally an icon button which event implemented later.
If you execute flutter run you should have the same results as below

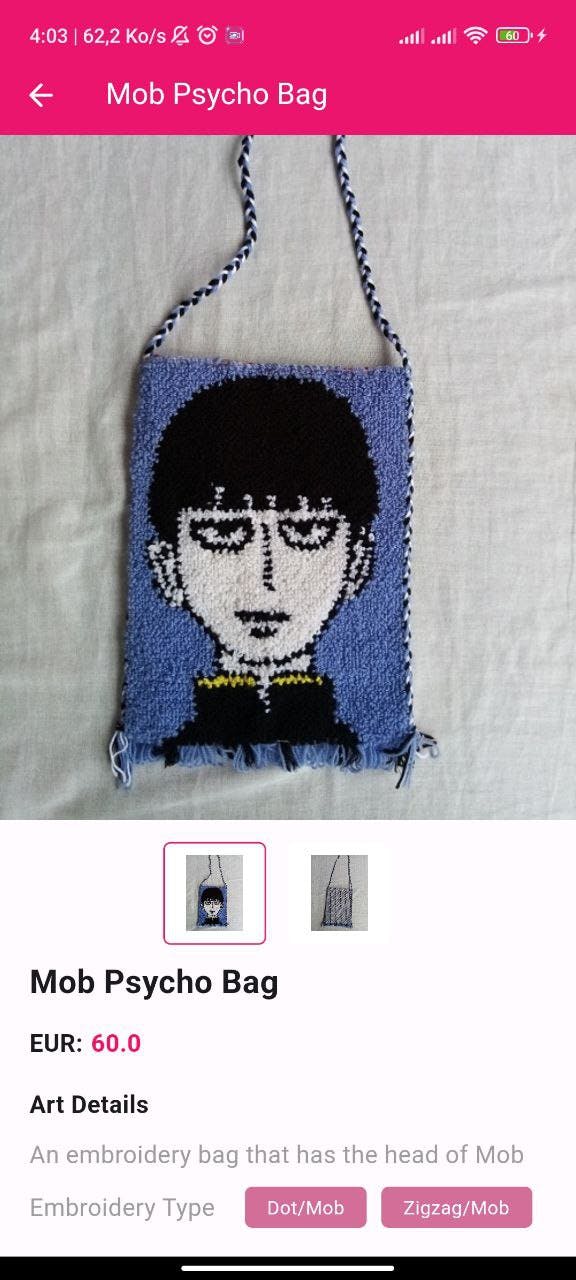
Build ArtDetailScreen Screen
This component contains information regarding the artwork like:
art description
price
name
type
The detail screen will have one component for displaying an art and it variants.
ArtType Component
So in your lib/components/artType.dart add the following code:
import 'package:art_store/utils/utilities.dart';
import 'package:flutter/material.dart';
import '../models/artModel.dart';

class ArtType extends StatelessWidget {
  ArtType({Key? key, required this.art}) : super(key: key);

  final Arts art;

  @override
  Widget build(BuildContext context) {
    return Padding(
      padding: const EdgeInsets.symmetric(horizontal: 20.0),
      child: SingleChildScrollView(
        scrollDirection: Axis.horizontal,
        child: Row(
          children: [
            const Text('Embroidery Type',
                style: TextStyle(fontSize: 18, color: Colors.grey)),
            const SizedBox(width: 20),
            ...List.generate(
                art.variants.length,
                    (index) => Container(
                    margin: const EdgeInsets.only(right: 10.0),
                    padding: const EdgeInsets.symmetric(horizontal: 15.0),
                    decoration: BoxDecoration(
                        color: kPrimaryLight,
                        borderRadius: BorderRadius.circular(5.0)),
                    child: Container(
                      margin: EdgeInsets.symmetric(vertical: 5.0),
                      child: Center(
                          child: Text(
                            art.variants[index].title,
                            style: TextStyle(color: kWhite),
                          )),
                    ))),
          ],
        ),
      ),
    );
  }
}
The code block above returns a row containing various variants of artwork and then uses a List.generate which similar to Listview.builder Widget to display each variant of the artwork available.
ArtPrice Component
When you install Medusa, there are two default currencies: USD and EUR. However, you can add other currencies via the settings. In your lib/components/artPrice.dart add the code below
import 'package:art_store/utils/utilities.dart';
import 'package:flutter/material.dart';
import '../models/artModel.dart';

class ArtPrice extends StatelessWidget {
  const ArtPrice({Key? key, required this.art}) : super(key: key);

  final Arts art;

  @override
  Widget build(BuildContext context) {
    return SizedBox(
      height: 50.0,
      child: ListView.separated(
        itemCount: art.variants[0].prices.length,
        scrollDirection: Axis.horizontal,
        shrinkWrap: true,
        itemBuilder: (context, index) => Padding(
          padding: const EdgeInsets.symmetric(horizontal:20.0),
          child: Row(
            children: [
              Text(art.variants[0].prices[index].currencyCode.toUpperCase()+":",
                  style:
                  const TextStyle(fontWeight: FontWeight.bold, fontSize: 18)),
              const SizedBox(width: 5.0),
              Text('${art.variants[0].prices[index].amount / 100}',
                  style: TextStyle(
                      fontWeight: FontWeight.bold,
                      fontSize: 18,
                      color: kPrimary)
              ),
            ],
          ),
        ),
        separatorBuilder: (context, index) {
          return const SizedBox(width: 10.0);
        },
      ),
    );
  }
}
This code loops the price list and displays each amount corresponding to each currency(note that if you added prices in only one currency in the dashboard then you only get that currency displayed)
ArtDetailCard Component
The last component for the art detail screen is the detail card component. In your lib/component/artCardDetail.dart, add the code below
import 'package:art_store/components/artType.dart';
import 'package:art_store/components/artPrice.dart';
import 'package:flutter/material.dart';
import 'package:get/get.dart';
import '../models/artModel.dart' as model;
import '../utils/utilities.dart';

class ArtCardDetails extends StatefulWidget {
  const ArtCardDetails({Key? key, required this.art}) : super(key: key);
  final model.Arts art;
  @override
  _ArtCardDetailsState createState() => _ArtCardDetailsState();
}

class _ArtCardDetailsState extends State<ArtCardDetails> {
  int selectedImageView = 0;
  @override
  Widget build(BuildContext context) {
    return SingleChildScrollView(
      child: Column(
        crossAxisAlignment: CrossAxisAlignment.start,
        children: [
          SizedBox(
              width: Get.width,
              // height: Get.height * 0.35,
              child: Hero(
                  tag: widget.art.id,
                  child: Image.network("http://192.168.63.8:9000${Uri.parse(widget.art.images[selectedImageView].url).path}", fit: BoxFit.cover)

              )),
          Row(
            mainAxisAlignment: MainAxisAlignment.center,
            children: List.generate(
                widget.art.images.length, (index) => artReview(index)),
          ),
          Padding(
              padding: const EdgeInsets.only(left: 20, right: 20, top: 10, bottom: 0),
              child: Text(widget.art.title,
                  style: const TextStyle(
                      fontWeight: FontWeight.bold, fontSize: 24))),
          ArtPrice(art: widget.art),
          const SizedBox(height: 5.0),
          const Padding(
              padding: EdgeInsets.symmetric(horizontal: 20.0),
              child: Text('Art Details',
                  style: TextStyle(fontWeight: FontWeight.bold, fontSize: 18))),
          const SizedBox(height: 10.0),
          Padding(
              padding: const EdgeInsets.symmetric(horizontal: 20.0),
              child: Text(widget.art.description,
                  style: const TextStyle(fontSize: 18, color: Colors.grey))),
          const SizedBox(height: 10.0),
          ArtType(art: widget.art),
          const SizedBox(height: 20.0),
        ],
      ),
    );
  }

  GestureDetector artReview(int index) {
    return GestureDetector(
      onTap: () {
        setState(() => selectedImageView = index);
      },
      child: Container(
          margin: const EdgeInsets.only(right: 15, top: 15),
          padding: const EdgeInsets.only(left: 5.0, right: 5.0, top: 8, bottom: 8),
          width: 70,
          height: 70,
          decoration: BoxDecoration(
            color: kWhite,
            borderRadius: BorderRadius.circular(5),
            border: Border.all(
              width: 1,
              color: selectedImageView == index
                  ? const Color(0xffFB1164)
                  : Colors.transparent,
            ),
          ),
          child: Image.network("http://192.168.63.8:9000${Uri.parse(widget.art.images[index].url).path}" )
      ),
    );
  }
}
The ArtCardDetail provide detailed information in a SingleChildScrollView that enables you to make the Column widget scrollable in order to view all the information on the card.
Once you have created these components, finally create your art detail screen with the code below in the lib/screens/artDetailScreen.dart:
import 'package:flutter/material.dart';
import 'package:flutter_feather_icons/flutter_feather_icons.dart';
import '../components/artCardDetail.dart';
import '../models/artModel.dart' as model;
import '../utils/utilities.dart';

class ArtDetails extends StatefulWidget {
  const ArtDetails({Key? key, required this.art}) : super(key: key);

  final model.Arts art;

  @override
  State<ArtDetails> createState() => _ProductDetailsState();
}

class _ProductDetailsState extends State<ArtDetails> {

  @override
  Widget build(BuildContext context) {
    return Scaffold(
        appBar: AppBar(
          elevation: 0,
          backgroundColor: kPrimary,
          leading: IconButton(icon: Icon(FeatherIcons.arrowLeft, color: kWhite,), onPressed: () { Navigator.pop(context); },),
          title: Text(widget.art.title, style: TextStyle(color: kWhite),),
        ),
        body: ArtCardDetails(art: widget.art)
    );
  }
}
Now it's time to add the onTap event in the ArtCard that will redirect to the corresponding artwork detail whenever you tap on it.
In your lib/components/artCard.dartand add the code below in the GestureDetector Widget:
onTap: () {
        //Todo: Route to art Details Screen
        Get.to(() => ArtDetails(art: art));
},
Don’t forget to import the ArtDetails component
import '../screens/productDetailScreen.dart'
Voila! You have a simple e-commerce app setup for selling art products. If you run your backend and your flutter app you should have something similar to the screenshot below.
The next article will deal with adding a shopping cart to your Flutter app and adding items. However, you can go on and play by adding it or other functionalities it offers like:
Payment methods
Shipping methods
Gift cards
Notifications when there are new products or when a user makes a purchase.
There is still more you can add to customize your application and deploy your admin dashboard and backend on Heroku and Vercel respectively
If you are looking at using Medusa with other tools like Nuxt or Android then check out this article with Nuxt Integration and Android Integration
Medusa has more to offer just reach out to the documentation and grab anything you want. If you face any issues, head straight to the Discord server and ask your question. One of the community members or Maintainer will promptly reply